Get help with setting up and using the Warehouse Manager, so you can stay on top of your inventory movement.
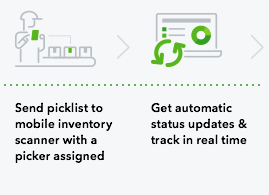
Warehouse Manager integrates seamlessly with QuickBooks Enterprise Advanced Inventory. It helps you efficiently receive items from purchase orders, or pick and pack items collected from a warehouse to complete sales orders.
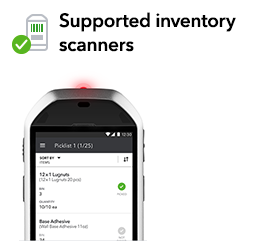
There are several supported mobile barcode scanner devices:
Discontinued by the manufacturer but still supported:
- Zebra TC20
- Zebra TC25
- Zebra TC51
- Zebra MC40
Download and install the QuickBooks Desktop mobile app
On a supported mobile barcode scanner
When installed, the app can receive picklists, scan barcodes to match items in the picklists, and send updated picklists back to QuickBooks Enterprise.
Step 1. Prepare the scanner
- Set up an internet connection on your scanner and enable WiFi.
Note: This is required to set up and use the mobile scanner device. - Set up the scanner according to the user instructions. If needed, you can download a user manual from the Internet.
- Use the power cord to fully charge the device before use.
- Turn on the device.
Step 2. Install the Android Application Package (APK)
Download and install the APK to make the QuickBooks Desktop mobile app work on your mobile barcode scanner.
- Download and install the app to your mobile barcode scanner.
- If you see this message: "We're sorry, this file format is not supported", select Download.
- Select the download complete notification to start the install. If you see an "Install Blocked" message, select Settings on the message.
- Open QuickBooks Desktop Warehouse App.
On an Android device (Version 4.4 or later)
When installed on an Android phone, the app can receive a picklist and send an updated picklist back to QuickBooks Enterprise. It can't do barcode scanning.
- Visit the app's page in Google Play. Sign in with the same Google account that you use for Google Play on your Android device.
- Select Install.
- Select the device you want to use. The app should download and install shortly.
Pair the device to your QuickBooks company file
| Note: You should be logged in to QuickBooks. If there is a prompt to sign in, enter your login credentials. |
- In the QuickBooks Edit menu, select Preferences.
- Select Items & Inventory, then go to the Company Preferences tab.
- Select Advanced Inventory Settings.
- On the Site Operations tab, select Add. QuickBooks gives you a passcode.
- On your mobile device, open the scanner/app, then enter the passcode.
- Select Link, then Yes.
- A success message appears indicating that the scanner is now linked to the QuickBooks company file.
- Select Next.
Your scanner or mobile device is now connected to QuickBooks. To start using the scanner, set up warehouse users (pickers). If the company file does not have pickers set up or sales orders that have been sent for picking, the scanner may display the error message “There are no users assigned to this company file."
Add Pickers
Each sales order contains inventory items. The warehouse worker who fills that order by collecting those items in the warehouse for packing and shipping is called a Picker. If the warehouse manager (or equivalent) has a sales order that needs to be filled, they create a Picklist and assigns a picker.
Note: With Advanced Inventory, you can assign a picklist to a picker, then send it to a mobile barcode scanner, (if you have one).
Once assigned, the Picker will:
- Go around the warehouse to collect all of the items that are on the Picklist.
- Scan the items using the mobile barcode scanner.
- Pack the items in a box for shipping.
To add a picker, you must create the picker as a vendor with the Type field set as Warehouse user.
Pickers can be both a vendor and an employee. To assign a Picklist to an employee, you need to make them a vendor.
| Note: To turn on the Warehouse user option in the drop-down list, check View Balances in the user’s role settings. |
Enable Warehouse User
- From the QuickBooks Company menu, select Users, then Set up Users and Roles.
- On the Role list tab, select the Role of the user, then Edit.
- Under Areas and Activities, select Centers and then select Vendor Center.
- Under Activity Access Level, check View Balance.
Add a Picker
- Under the Vendors menu, go to Vendor Center.
- From the New Vendor drop-down list, select New Vendor.
- In the Vendor name field, enter the name of the Picker.
- Select the Additional Info tab.
- From the Vendor Type drop-down list, select Warehouse user.
The names of all the pickers added in QuickBooks will appear on the scanner.
To update or remove a picker, update or remove a vendor.
Create a picklist
A Picklist is a list of items to be collected from the warehouse to fill a sales order.
| Note: To use the new sales order fulfillment flow and a mobile barcode scanner with QuickBooks, enable the appropriate Advanced Items and Inventory preference. Get more help with customizing user roles. |
- From the QuickBooks Customers menu, select Sales Order Fulfillment Worksheet.
- Select the order you want to fulfill, then Next. The Items List window includes all items with inventory details on the sales order that are required for picking.
- Select the details for the Picklist.
| Field | Description |
| ITEMS | Select the items you want to be picked for this order. All of the items that can be sent for picking are selected by default, but you can clear any checkboxes you don't want to fulfill right now. The following items aren't selected by default:
- The item isn't in stock (FULFILL QTY is 0). The FULFILL QTY field is prefilled with Ordered or Available quantities, whichever is less. You can only select this item if the quantity is greater than 0. To override this value, enter a number in the FULFILL QTY field for the item.
- The item is a part of another open Picklist.
- The item doesn't have a warehouse assigned to it. Note: To select this item, assign a warehouse. In the bottom left of the window, you can see X items of Y selected. This indicates the number of items you selected out of the items in the order, which is useful if you have a large number of items.
|
| ITEM DESCRIPTION | Non-editable. A description of the item as listed in the inventory center. |
| ORDERED | Non-editable. The quantity of items that have been ordered for that item. You can use this information to determine if there are more items incoming in case the item is out of stock. |
| INVOICED | Non-editable. The number of items that are invoiced. You don't have to fulfill this quantity as it's already been picked. |
| OPEN | Non-editable. The number of items that still need to be fulfilled. This value is calculated by subtracting the number of items invoiced from the number of items ordered. (OPEN = ORDERED - INVOICED) |
| AVAILABLE | Non-editable. The quantity of an item that is available in stock across all warehouses. To check the quantity of the item in different warehouses, select the stock icon next to the quantity. |
| AMOUNT | Non-editable. The sale price of the item multiplied by the open quantity. |
| STATUS | Picked status of individual items:
- Sent for picking: The item has been sent for picking.
- Pick in progress: The picker is in the process of picking the item. The status changes from “Sent for picking” to “Pick in progress” when the first item is picked.
- Picked: The picker has picked the complete quantity of the item. (Picker's task is complete and information is sent to QuickBooks.)
- Partially picked: The picker has picked some quantity of that specific item. In this case, the picker can write a note stating the reason. (Picker's task is complete and information is sent to QuickBooks.)
- Not picked: When the picker has started with picking but the item is not available for picking. In this case, the picker can write a note stating the reason. (Picker's task is complete and information is sent to QuickBooks.)
- Completed: The Picklist has been completed and the sales order has been updated (Done by the warehouse manager in QuickBooks). Non-editable. Indicates the current pick status of the item.
|
| TO FULFILL QTY | Editable. The number of items to pick for this order. This value is pre-filled with the Open quantity or the Available quantity in the selected warehouse, whichever is less. You can change this number if needed. However, the picker can only pick the quantity that's physically available in the warehouse. In this case, the order is partially picked and you have to create another Picklist later to finish filling the order. |
| SITE | You can see this column if you enabled multiple sites in your company preferences. Only active warehouses will be listed.
Editable. Mandatory field.
The warehouse where the item will be picked from. This field can be filled for a given item or sales order when the sales order is being created, or it can be filled before the sales order is selected in the previous screen. You must fill this in to include the item in the Picklist. The Fulfillability field will change based on the availability of the item in the selected site. |
| BIN | You can see this column if you track bin locations (rows, shelves, or bins) in QuickBooks.
Editable. Optional.
The bin name in the warehouse where this item is located. If you have a default bin location set up for purchasing and sales, this field is filled in each time you select a site. You can enter or update a bin number in this field.
The picker will pick from the specified bin. If there’s no bin specified, the picker knows where the items should be picked from. See the default Bin Locations in Sales and Receipts. |
| FULFILLABLE | Non-editable. Indicates whether the item is available to fill the sales order in its entirety. This will depend on the quantity available at the selected SITE and may change if the SITE field changes.
- Green (Yes): All items are available at the selected site
- Red (No): No Items are available at the selected site
- Orange (Partial): Some items are available at the selected site
- Other (with Gray status): No site was selected. Select a site to change this status.
|
- After you select the items to be picked for the given sales order, select Next.
- The Picklist creation window appears. Complete the following fields:
| Field | Description |
| Picklist name | QuickBooks will generate a default name for your Picklist.
This is based on the sales order and ensures that each Picklist created for your company file has a unique name. You can change it if needed, but we recommend that you keep the default name unless your sales order fulfillment process requires a name in a different format. Note: QuickBooks doesn't flag a duplicate name. |
| Picker's name | Choose the picker from the drop-down. You must assign a picker before you print or send the Picklist to a scanner. The picker must be on the list. If they aren't on the list, add them to QuickBooks. |
| Add note for Picker | Optional. 70 character limit. If you have a specific message you want the Picker to know about the order (example: This is needed urgently, use Priority shipping), add it here. Any notes sent to or from the Picker are saved as part of sales order Notes. |
- On the scanner, check that you can access the Picklist:
- Open the QuickBooks Warehouse app.
- Select your name from the list.
- Select the Picklist you just created.
Note: If you can’t see the Picker or the Picklist, close and reopen the Sales Order Fulfillment Worksheet or scan an item from the Picklist.
- Select one of the following options for each Picklist:
- Create & Send: Create the Picklist and send it to all mobile barcode scanners linked to the company file for picking. Note that the scanner must be linked and ready for use before sending the Picklist. A message will appear if the Picklist is sent successfully.
- Create & Print: Create the Picklist and print it out. You can choose this option if you don't have a mobile barcode scanner, or if all the scanners are already in use.
- Follow the picking progress. Once the Picklist is created, the Create & Send button changes to a View Progress. Select View Progress to see the progress of the pick. This also opens the Picklist so you can see all the details. As the picker updates the Picklist on their scanner, you can select the Refresh icon in the top right corner to update your view and follow their progress.
- Complete the Picklist. You can view the Picklist and select Update Sales Order. QuickBooks saves completed Picklists for 30 days.
Having some trouble with your app? Here's how to troubleshoot the Warehouse Manager for QuickBooks Desktop mobile.
Want to know more about Pick, Pack, Express pack, Cycle count, and purchase order management sheet? See here: